Making installation better, simpler, faster, and less expensive
It’s obvious that every low-voltage landscape light we install needs to be connected to a power source. But not so obvious, is the fact that there are several ways to make that connection.
How do we bring power to an outdoor lighting fixture? We could run a separate wire for each light directly from the transformer – but that would be too many wires. We could run a wire to the first fixture, then from that fixture to the next fixture. That’s called a daisy chain. It saves wire and is OK for short chains of fixtures, but you can run into trouble with voltage loss. Better still is the “Hub Method”.
 The “Hub Method” describes the technique of connecting all lights in a region to each other. The fixture wires converge in a place called the hub. These wires are then connected together along with a wire from the power supply to send power to all the fixtures in the hub. There are a few types of hub connectors designed for this purpose. We’ll describe them, but first, let’s list the benefits of hub connections.
- Equalizes voltage at fixtures. As long as fixture lead wires are of equal length, then wire length from each fixture to the transformer will also be equal. This means the voltage loss will be equal and the voltage at the fixtures will also be equal. This is very important for older-style halogen lamps because they have a narrow range of acceptable voltage (10V to 12V); less important for LEDs since the range is much wider (8V to 15V). Still, larger systems (20 or more fixtures) have larger voltage drops so it’s good to equalize voltage whenever possible.
- Reduces number of splices. With daisy chain wiring, one wire is run from fixture to fixture – with a splice at each fixture: 36 fixtures = 36 splices. When hubs are used, several fixtures can be connected at each junction. For example, with a daisy chain 8 fixtures = 8 splices; with two hubs in a system 8 fixtures = 2 splices. Reducing splices saves time and money, and increases the reliability of the system over time.
- Makes splices accessible. Some hubs are set inside junction boxes that can be easily accessed for troubleshooting or for adding additional fixtures.
Select the Best Hub Connectors from VOLT®
VOLT offers the following hub-type connectors:
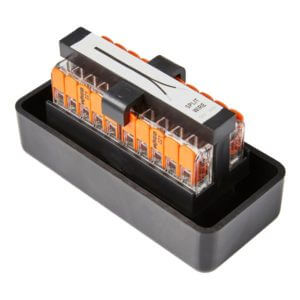
- VOLT® Pro Junction Hub. This groundbreaking hub-style junction box uses clamp-type terminal blocks mounted to the underside of the junction container cap. Unlike other hub-style connectors, the wires are clamped in place without messy wire nuts. With the Pro Junction Hub, wires can be accessed and connected or disconnected when needed. (Note: this new improved version features clamps that are easier to open and close.)
- VOLT® Zone Control Junction Box. This is the predecessor of the Pro Junction Hub. Instead of clamps, it uses ‘silicone grease’-filled wire nuts. It makes excellent connections, and is accessible after installation, but you cannot add or remove wires from the wire nuts. The main advantage of this hub over the newer Pro model, is the lower price.
- VOLT® Pro Micro-Junction Direct Burial Connector. This uses similar clamps as with the Pro Junction Hub, but it is not contained within a junction box. Instead, this connector is intended to be buried. The connections are secure and watertight but they are not accessible after installation. Sometimes you need to bury a hub connection.
Installation Guide
The basic approach to using hub connections is to identify groups of fixtures within about a 40-foot circle. These are called zones. You will run one wire from the transformer to the center of each zone. That wire will connect to all the fixtures in the zone. Use one of the above three hub junctions to connect these wires.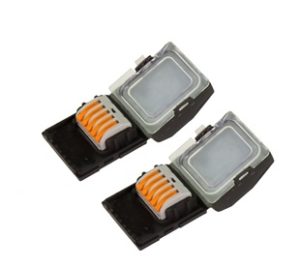
How many fixtures per hub? Each hub connector can accommodate a limited number of fixture wires. The Pro Junction Hub accepts up to 7 fixtures, the Zone Control Hub and the Pro Micro-Junction Hub each accepts 4 fixtures. Note that if you have more than 7 fixtures in a zone, you can use two hub connectors – the first hub connects to the transformer, the second hub connects to the first.
How many watts per hub? All VOLT hub connectors can accommodate at least 20 amps (equivalent to 240 watts at 12 volts). This is a very high value and would only be reached if you are still using halogen lamps. Switch to LED lamps instead for extremely low wattage consumption.
Can I connect multiple hubs throughout my property? Yes, you can connect one hub to another to conserve wire. Just be mindful of voltage loss and total load on the wire. Voltage loss is a function of wire length, wire gauge, and total wattage on the wire. If you have a very extensive system, use a voltmeter to check voltage at your hub connector. Be sure that your voltage is within the operating range of your fixtures.